

How to Use the Fast Access Bar
This guide shows you how to use the Fast Access Bar to quickly manage participants, add/remove them from scenes, and access participant controls.
Quick Steps
- Look at the Fast Access Bar at the bottom of the editor
- Hover over a participant thumbnail to see options
- Click Add or Remove to manage scene presence
- Click the three dots for more options
What is the Fast Access Bar?
The Fast Access Bar is a horizontal strip of participant video thumbnails that provides:
- Quick preview of all participants
- One-click add/remove from scenes
- Access to participant settings
- Audio monitoring (sound jumpers)
- Connection quality indicators
Finding the Fast Access Bar
- Location: Bottom of the editor, between the scene and scenes panel
- Visibility: Can be hidden/shown using the arrow button
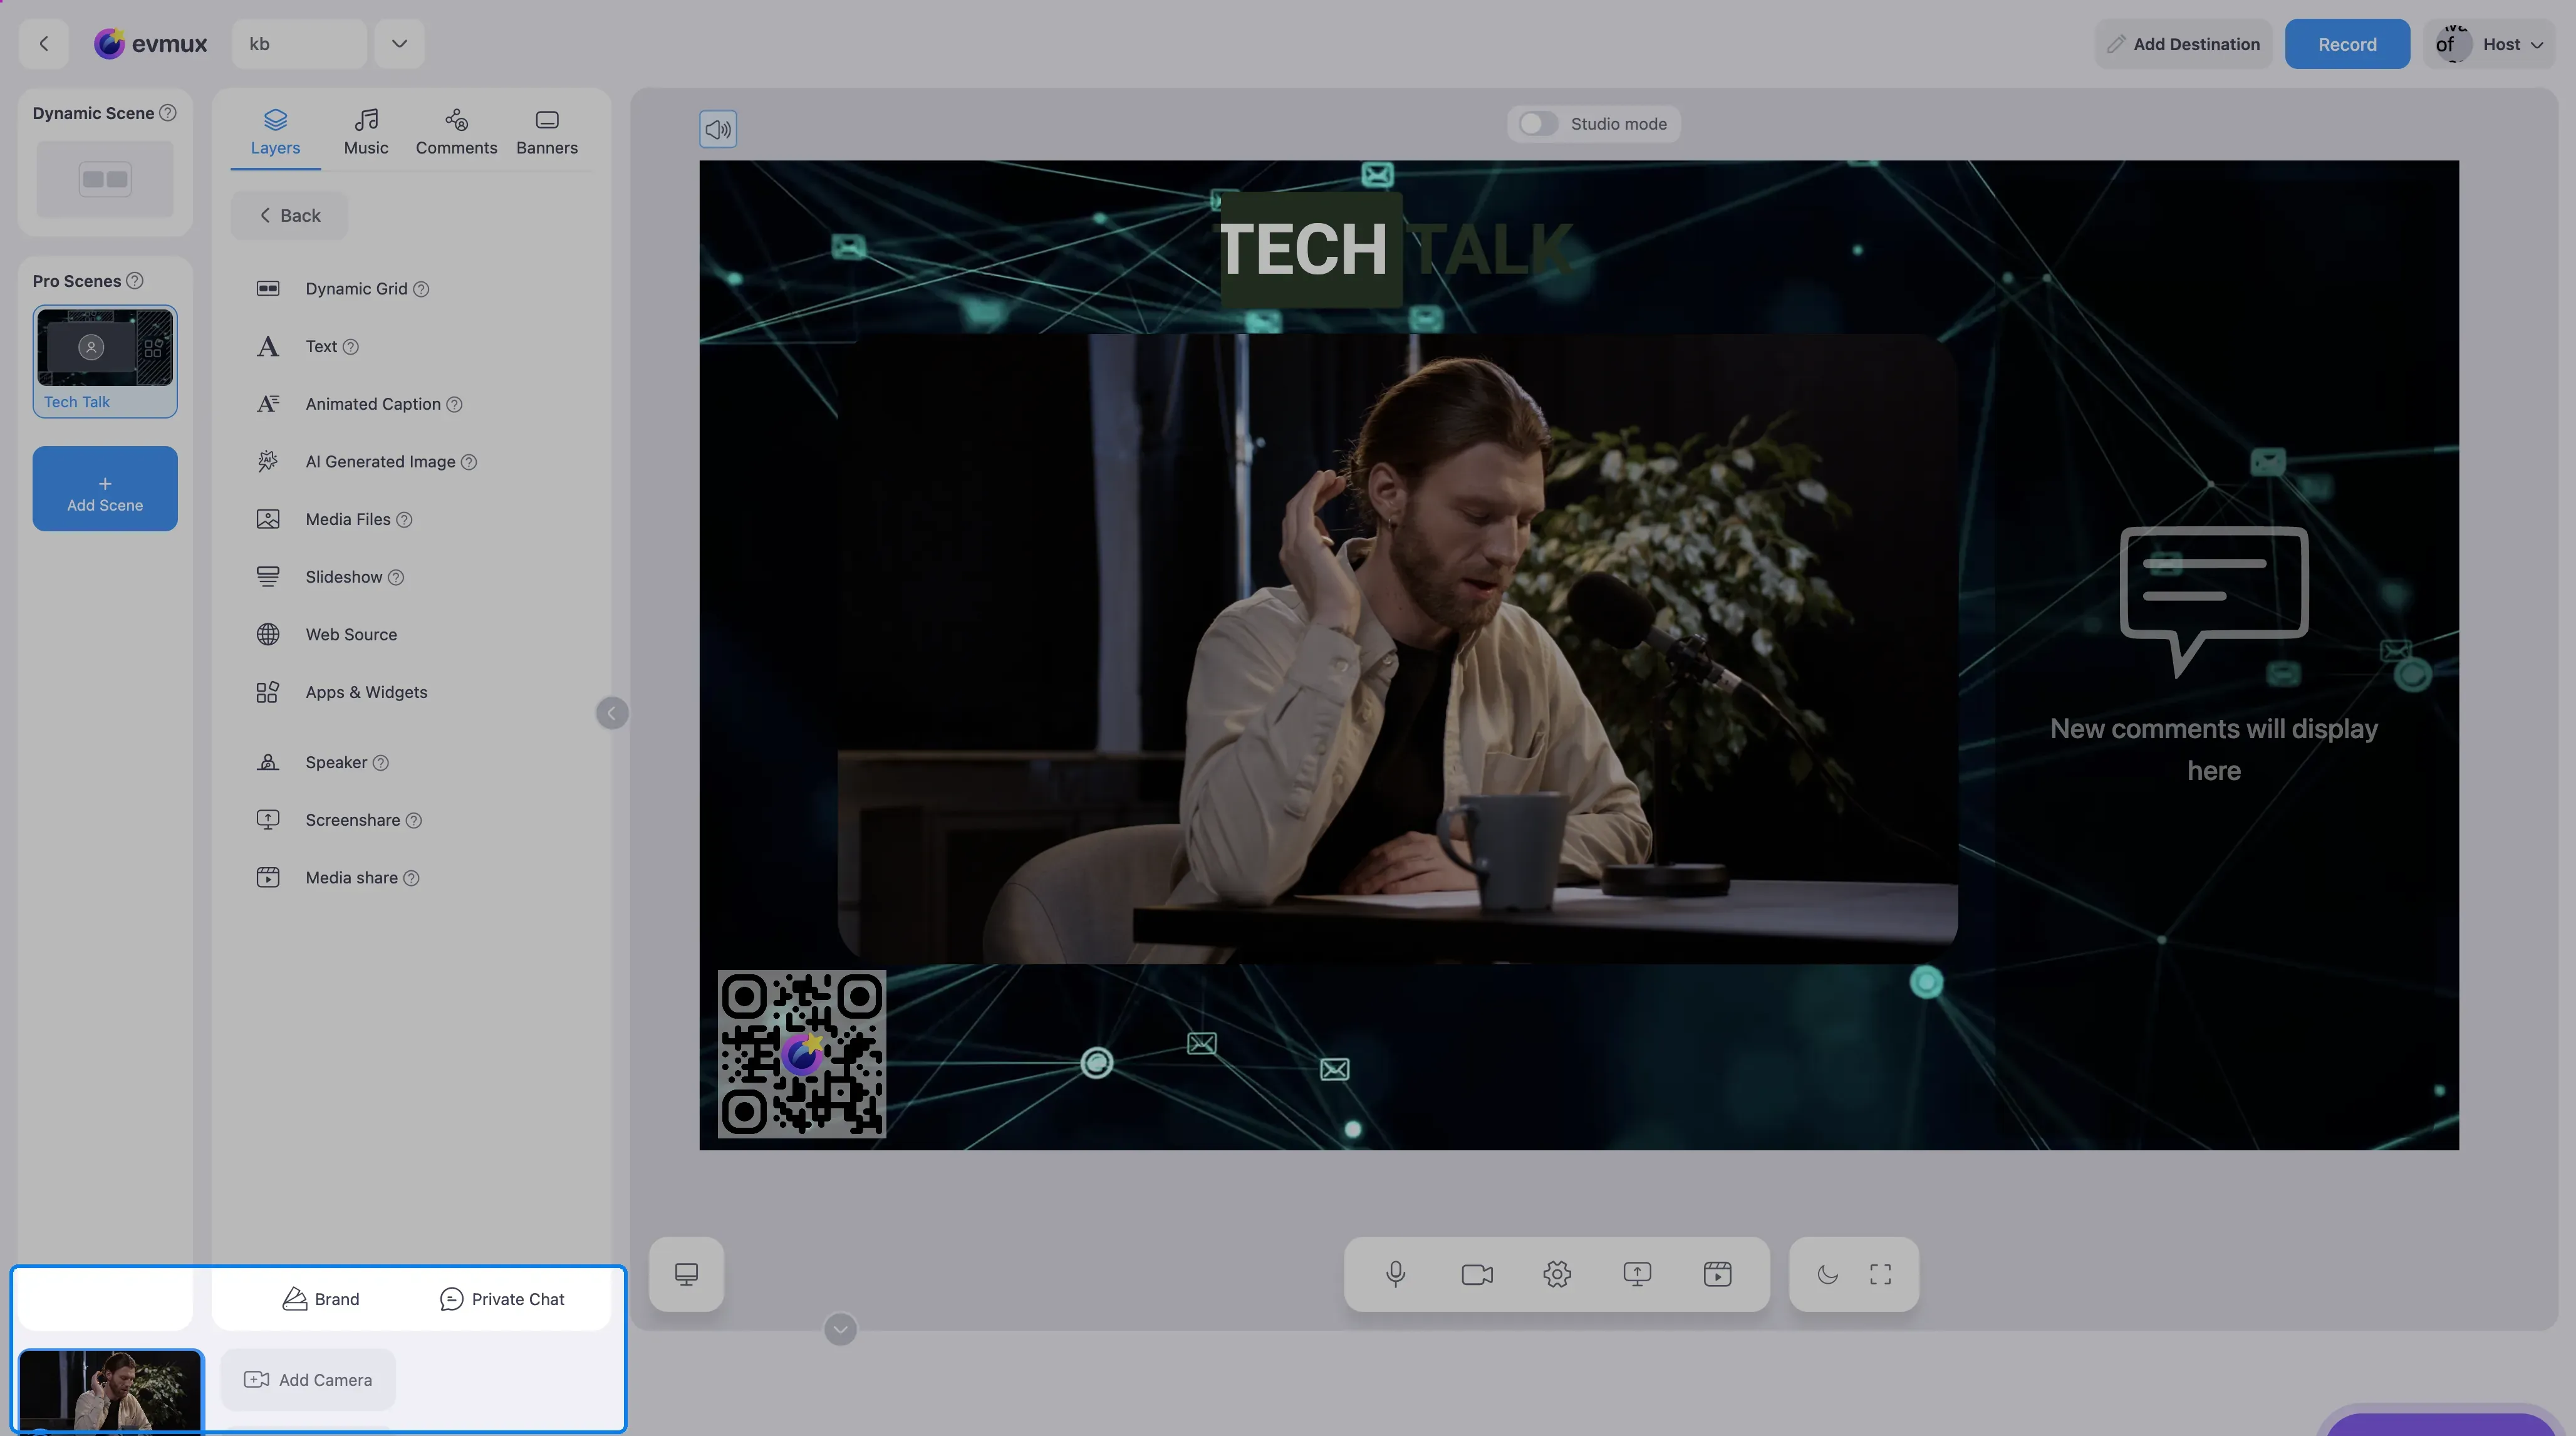
Scene-Specific Behavior
The Add/Remove button is always visible on hover in editor mode. However, it behaves differently depending on the current scene type:
| Scene Type | Add Button Action | Remove Button Action |
|---|---|---|
| Dynamic Scene | Adds to Dynamic Scene grid | Removes from grid |
| Pro Scene (no Dynamic Grid) | Adds as individual layer | Deletes layer (with confirmation) |
| Pro Scene (with Dynamic Grid) | Adds to Dynamic Grid | Removes from grid |
The options menu (three dots) is available on every tile, but it is for the participant themselves — settings, volume, chat, name, avatar, kick — not for adding them to a scene. Adding and spotlighting are done with the tile’s own hover buttons.
Adding a Participant to the Scene
Step 1: Locate the Participant
- Look at the Fast Access Bar thumbnails
- Find the participant you want to add
- Participants NOT in the current scene show normally
- Participants IN the scene show highlighted
Step 2: Add to Scene
- Hover over the participant thumbnail
- The Add button appears
- Click Add
- Participant is added based on scene type:
- Dynamic Scene: Added to auto-arranging grid
- Pro Scene with Dynamic Grid: Added to Dynamic Grid
- Pro Scene without Dynamic Grid: Added as individual layer
There is no add-to-scene item in the three-dots menu — the hover button on the tile is the only way.
Removing a Participant from the Scene
Step 1: Find the Active Participant
- Look for highlighted thumbnails (indicates they’re in the scene)
- The participant shows “Remove” on hover
Step 2: Remove from Scene
- Hover over the highlighted thumbnail
- Click Remove
- Participant is removed from the current scene
Using Listen Offstage Feeds
This feature lets you hear participants who are not currently on screen.
Enable Offstage Audio
- Look at the left side of the Fast Access Bar
- Find “Listen Offstage Feeds” toggle
- Click to enable (toggle turns active/highlighted)
- You can now hear all participants
Disable Offstage Audio
- Click the toggle again
- Only participants in the scene are heard
Use case: Great for hearing a guest’s question before adding them to the scene.
Accessing Participant Options
Open the Options Flyout
- Hover over a participant thumbnail
- Click the three dots button (options)
- The flyout panel opens with sections:
Available Options
- Settings - opens that person’s studio settings (a guest is asked to approve)
- Volume - their level, or an Ask to unmute button when they are muted
- Open Chat - private chat with this participant
- Edit name - name, title, company, position (used by lower thirds)
- Change Avatar
- Init / Stop screen share, Init / Stop media share - on your own tile
- Kick Speaker
- Remove camera - for an extra (multicam) camera
The menu has no chroma-key controls and no scene actions. Chroma key is a layer setting on the scene (brush dropper of the layer toolbar); adding to a scene and spotlight are the tile’s hover buttons; Push to Talk is a hold-down button in the tile’s side strip.
Using Spotlight from Fast Access Bar
Enable Spotlight
- Hover over a participant thumbnail
- Click the Spotlight button (small icon in corner)
- The participant takes the full Dynamic Scene
- Button turns blue/active
Disable Spotlight
- Click the Spotlight button again
- Layout returns to normal with all participants
Note: Spotlight cannot be changed during live broadcast.
Monitoring Audio Levels
Each participant has a Sound Jumper indicator:
Reading the Sound Jumper
| Indicator | Meaning |
|---|---|
| Animated bars | Participant is speaking |
| No bars | Silent |
| Muted icon | Audio is muted |
Quick Mute/Unmute
- Click directly on the sound jumper
- Toggles mute state for that participant
- Works only for editors
Checking Connection Quality
Each participant shows an internet connection indicator:
| Bars | Quality |
|---|---|
| 4 bars | Excellent |
| 3 bars | Good |
| 2 bars | Fair |
| 1 bar | Poor |
| Red warning | Connection issue |
The indicator sits on the tile and is visible when the pointer is not over that tile — hovering swaps it for the tile’s action buttons. To read someone’s connection, look at the tile without hovering over it.
Tip: Check connection quality before going live to anticipate issues.
Hiding/Showing the Fast Access Bar
Hide the Bar
- Find the circular arrow button
- Click it (arrow points down when visible)
- Bar collapses
Show the Bar
- Find the circular button (now shows up arrow)
- Click to expand the bar
Scrolling Through Participants
When you have many participants:
- Scroll buttons appear on left/right sides
- Click left arrow to scroll left
- Click right arrow to scroll right
- Or use mouse wheel/trackpad to scroll
Participant Feed Types
The Fast Access Bar shows different feed types with icons:
| Icon | Feed Type |
|---|---|
| Screen icon | Screen share |
| Camera 2/3 icon | Multicam feeds |
| Checkmark badge | Editor (verified) |
| Video icon | Media share |
Best Practices
Before Going Live
- Review all participants in the Fast Access Bar
- Check connection quality for each
- Enable “Listen Offstage Feeds” to do audio checks
- Test Add/Remove functionality
During Broadcast
- Use Add/Remove for quick scene changes
- Monitor sound jumpers for speaking participants
- Check connection indicators for quality issues
- Use Spotlight for focus moments
Managing Many Participants
- Scroll through to see everyone
- Highlighted thumbnails = currently in scene
- Use the options flyout for advanced controls
Troubleshooting
Participant not appearing?
- Check if they’re connected (look for “No connection” text)
- Verify they joined the session
- Refresh the page if needed
Can’t hear participant?
- Check if they’re muted (look at sound jumper)
- Enable “Listen Offstage Feeds” if they’re not in scene
- Verify their microphone is working
Add button not working?
- Check if you’re in editor mode
- Verify the scene supports adding participants
- Try using the options flyout instead
Connection indicator shows warning?
- Participant may have poor internet
- Audio/video quality may be affected
- Consider asking them to improve connection
Related
- Fast Access Bar UI Reference
- Scene Types: Dynamic Scene vs Pro Scene
- How to Use the Dynamic Scene
- How to Add a Dynamic Grid
- How to Add a Camera Layer
- How to Mute/Unmute a Participant
- How to Use Spotlight
- How to Use Exclusive Talk