

How to Add a Frame Around Your Camera
Frames are decorative borders that appear around your camera, screen shares, or media layers. You can set a default frame for all layers in Branding, then optionally override it for specific layers.
Recommended Workflow
- First: Set your default frame in Branding Settings (applies to all layers)
- Then: Override specific layers if needed using the Layer Toolbar
Step 1: Set Default Frame in Branding Settings
This sets the frame that will appear on ALL camera layers by default.
How to Access Branding Frames:
- Go to the Brand tab in the left sidebar
- Scroll down to find the Frames section
- You’ll see the built-in animated frames first (Solid Line, Comet, Ribbon, Electric, Vines, Sparkle), then your uploaded image frames
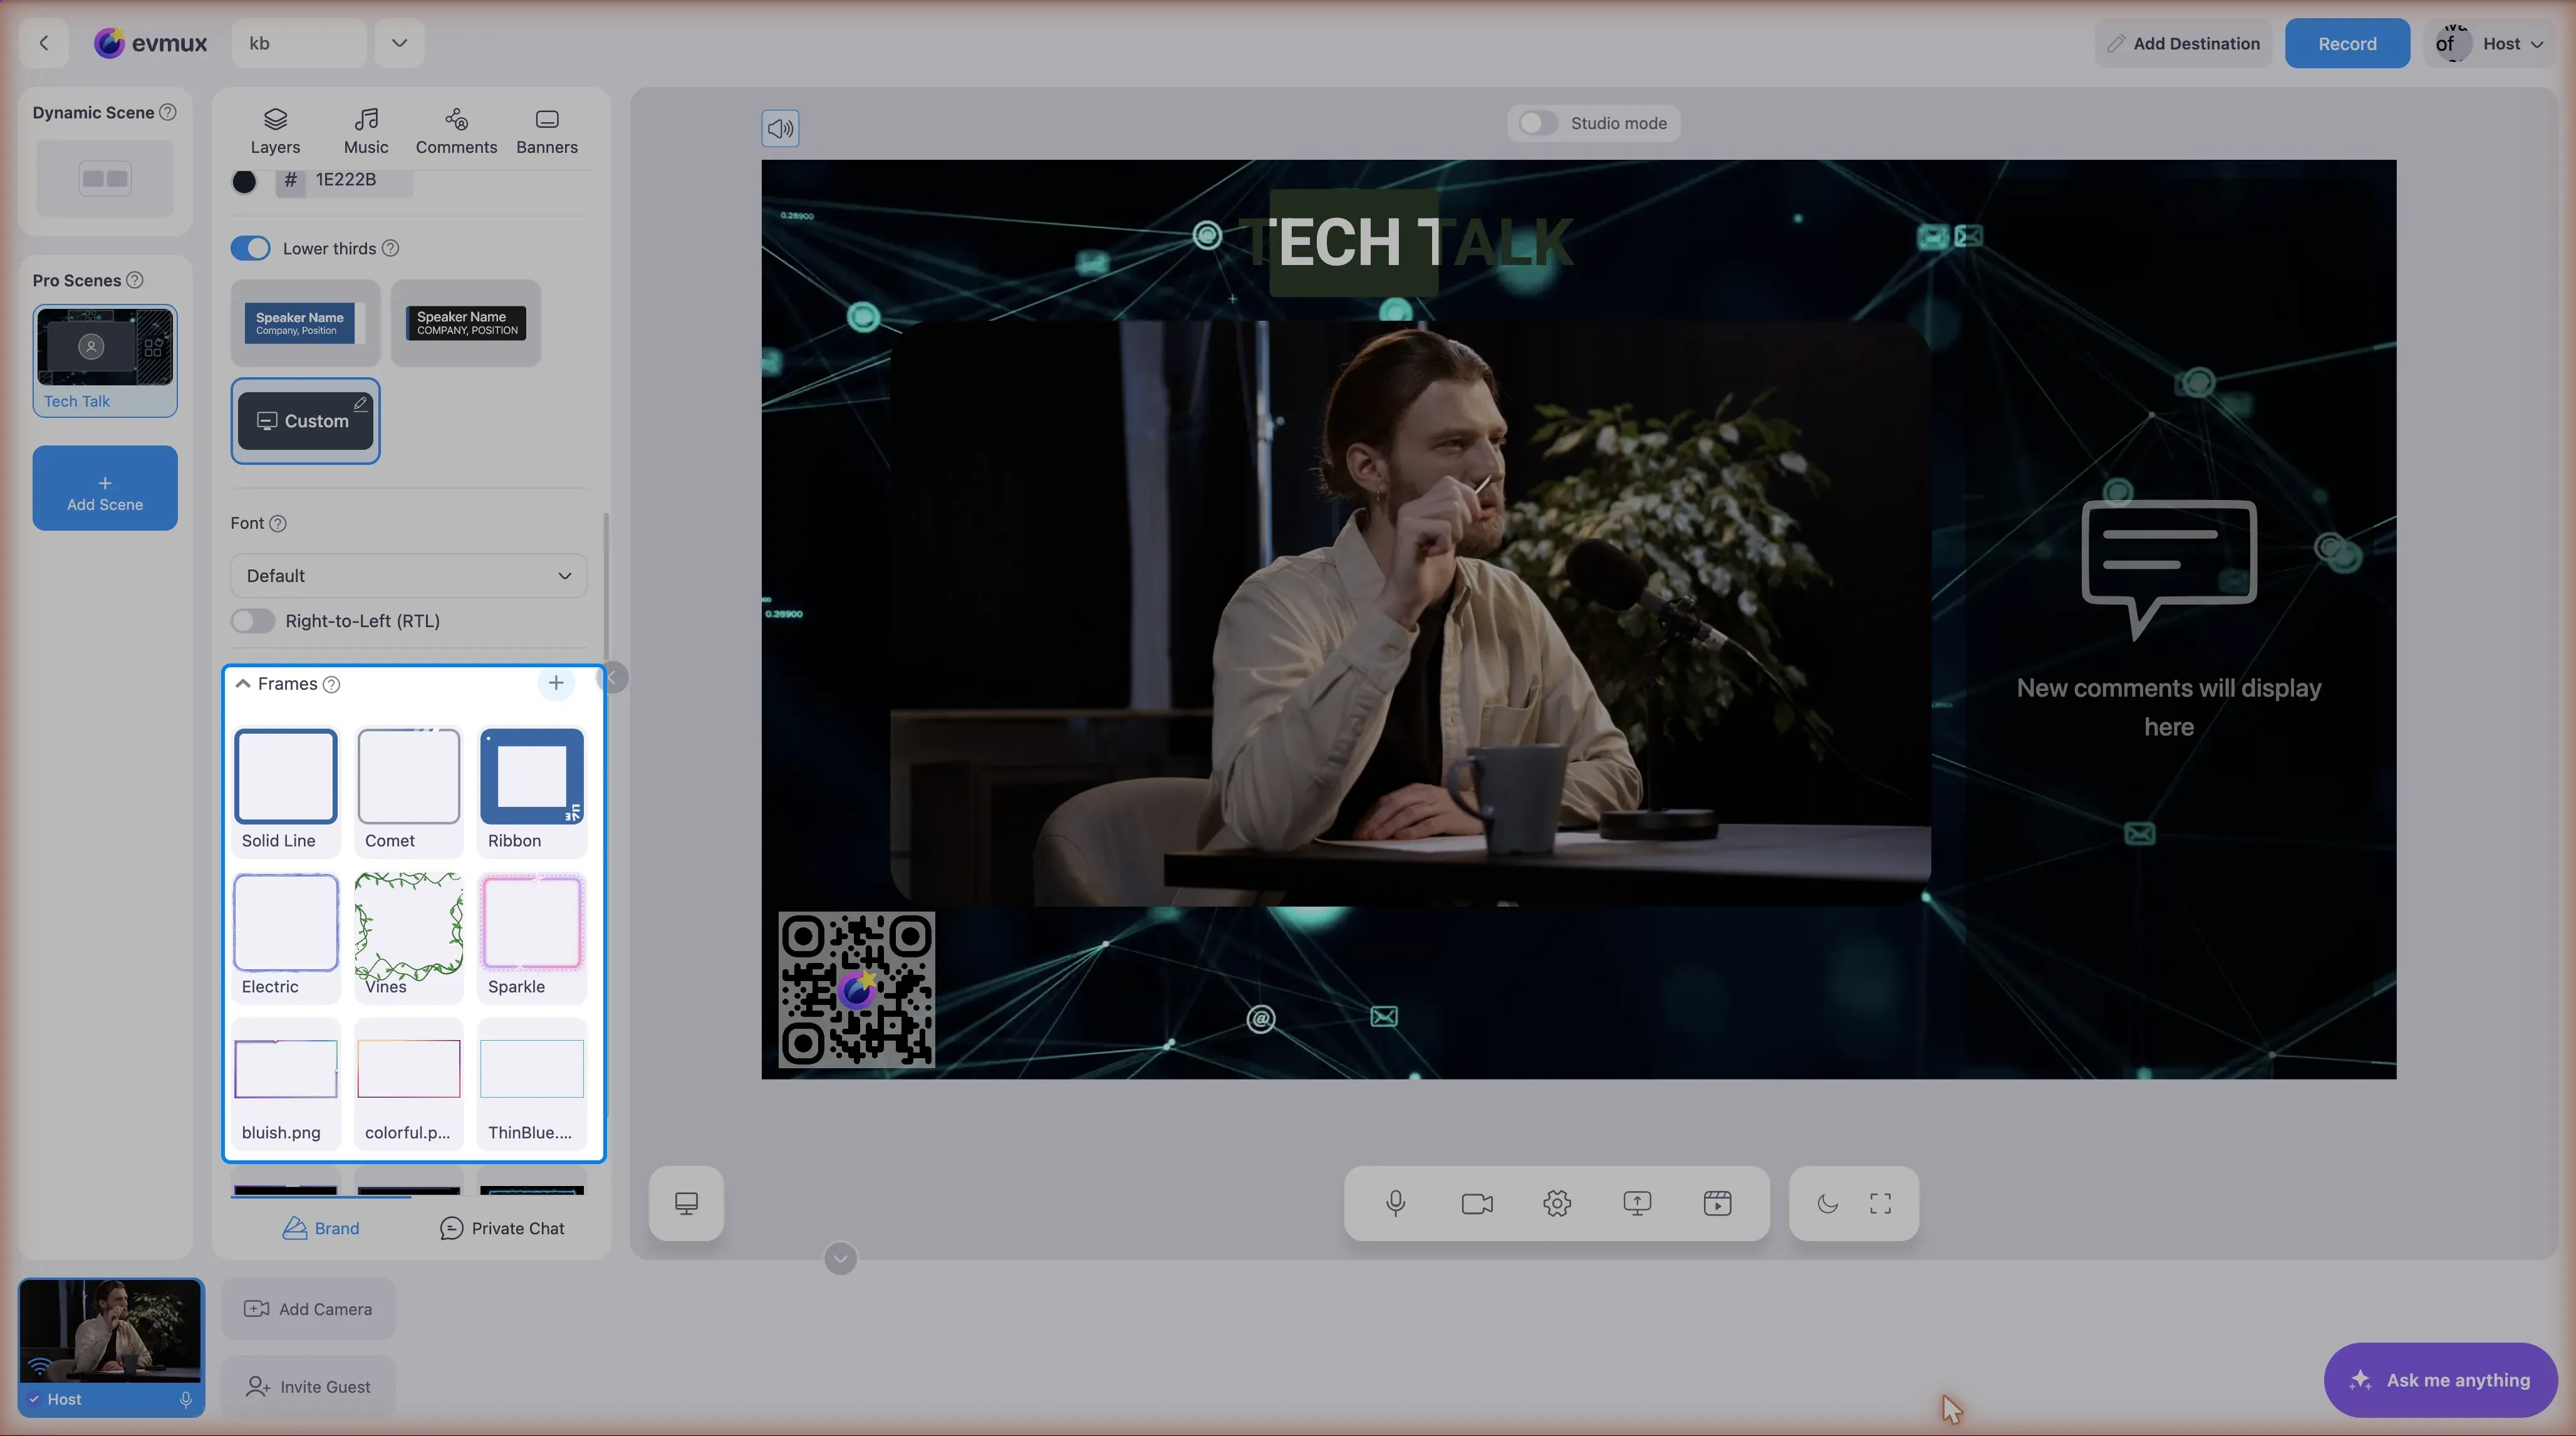
Frame Options in Branding:
| Option | Description |
|---|---|
| Solid Line | A simple colored border, optionally a gradient (recommended for beginners) |
| Comet | A glowing light streak that travels around the edge with a fading tail |
| Ribbon | A text marquee running around the edge on a colored band (for example LIVE or your handle) |
| Electric | Crackling electric arcs along the edge |
| Vines | Weeds that grow from the corners, bloom with flowers, wither and grow again |
| Sparkle | A glossy pastel band with pearls, twinkling sparkles and floating hearts |
| Image Frames | Pre-designed or custom uploaded frame images |
| + Add | Upload your own custom frame image |
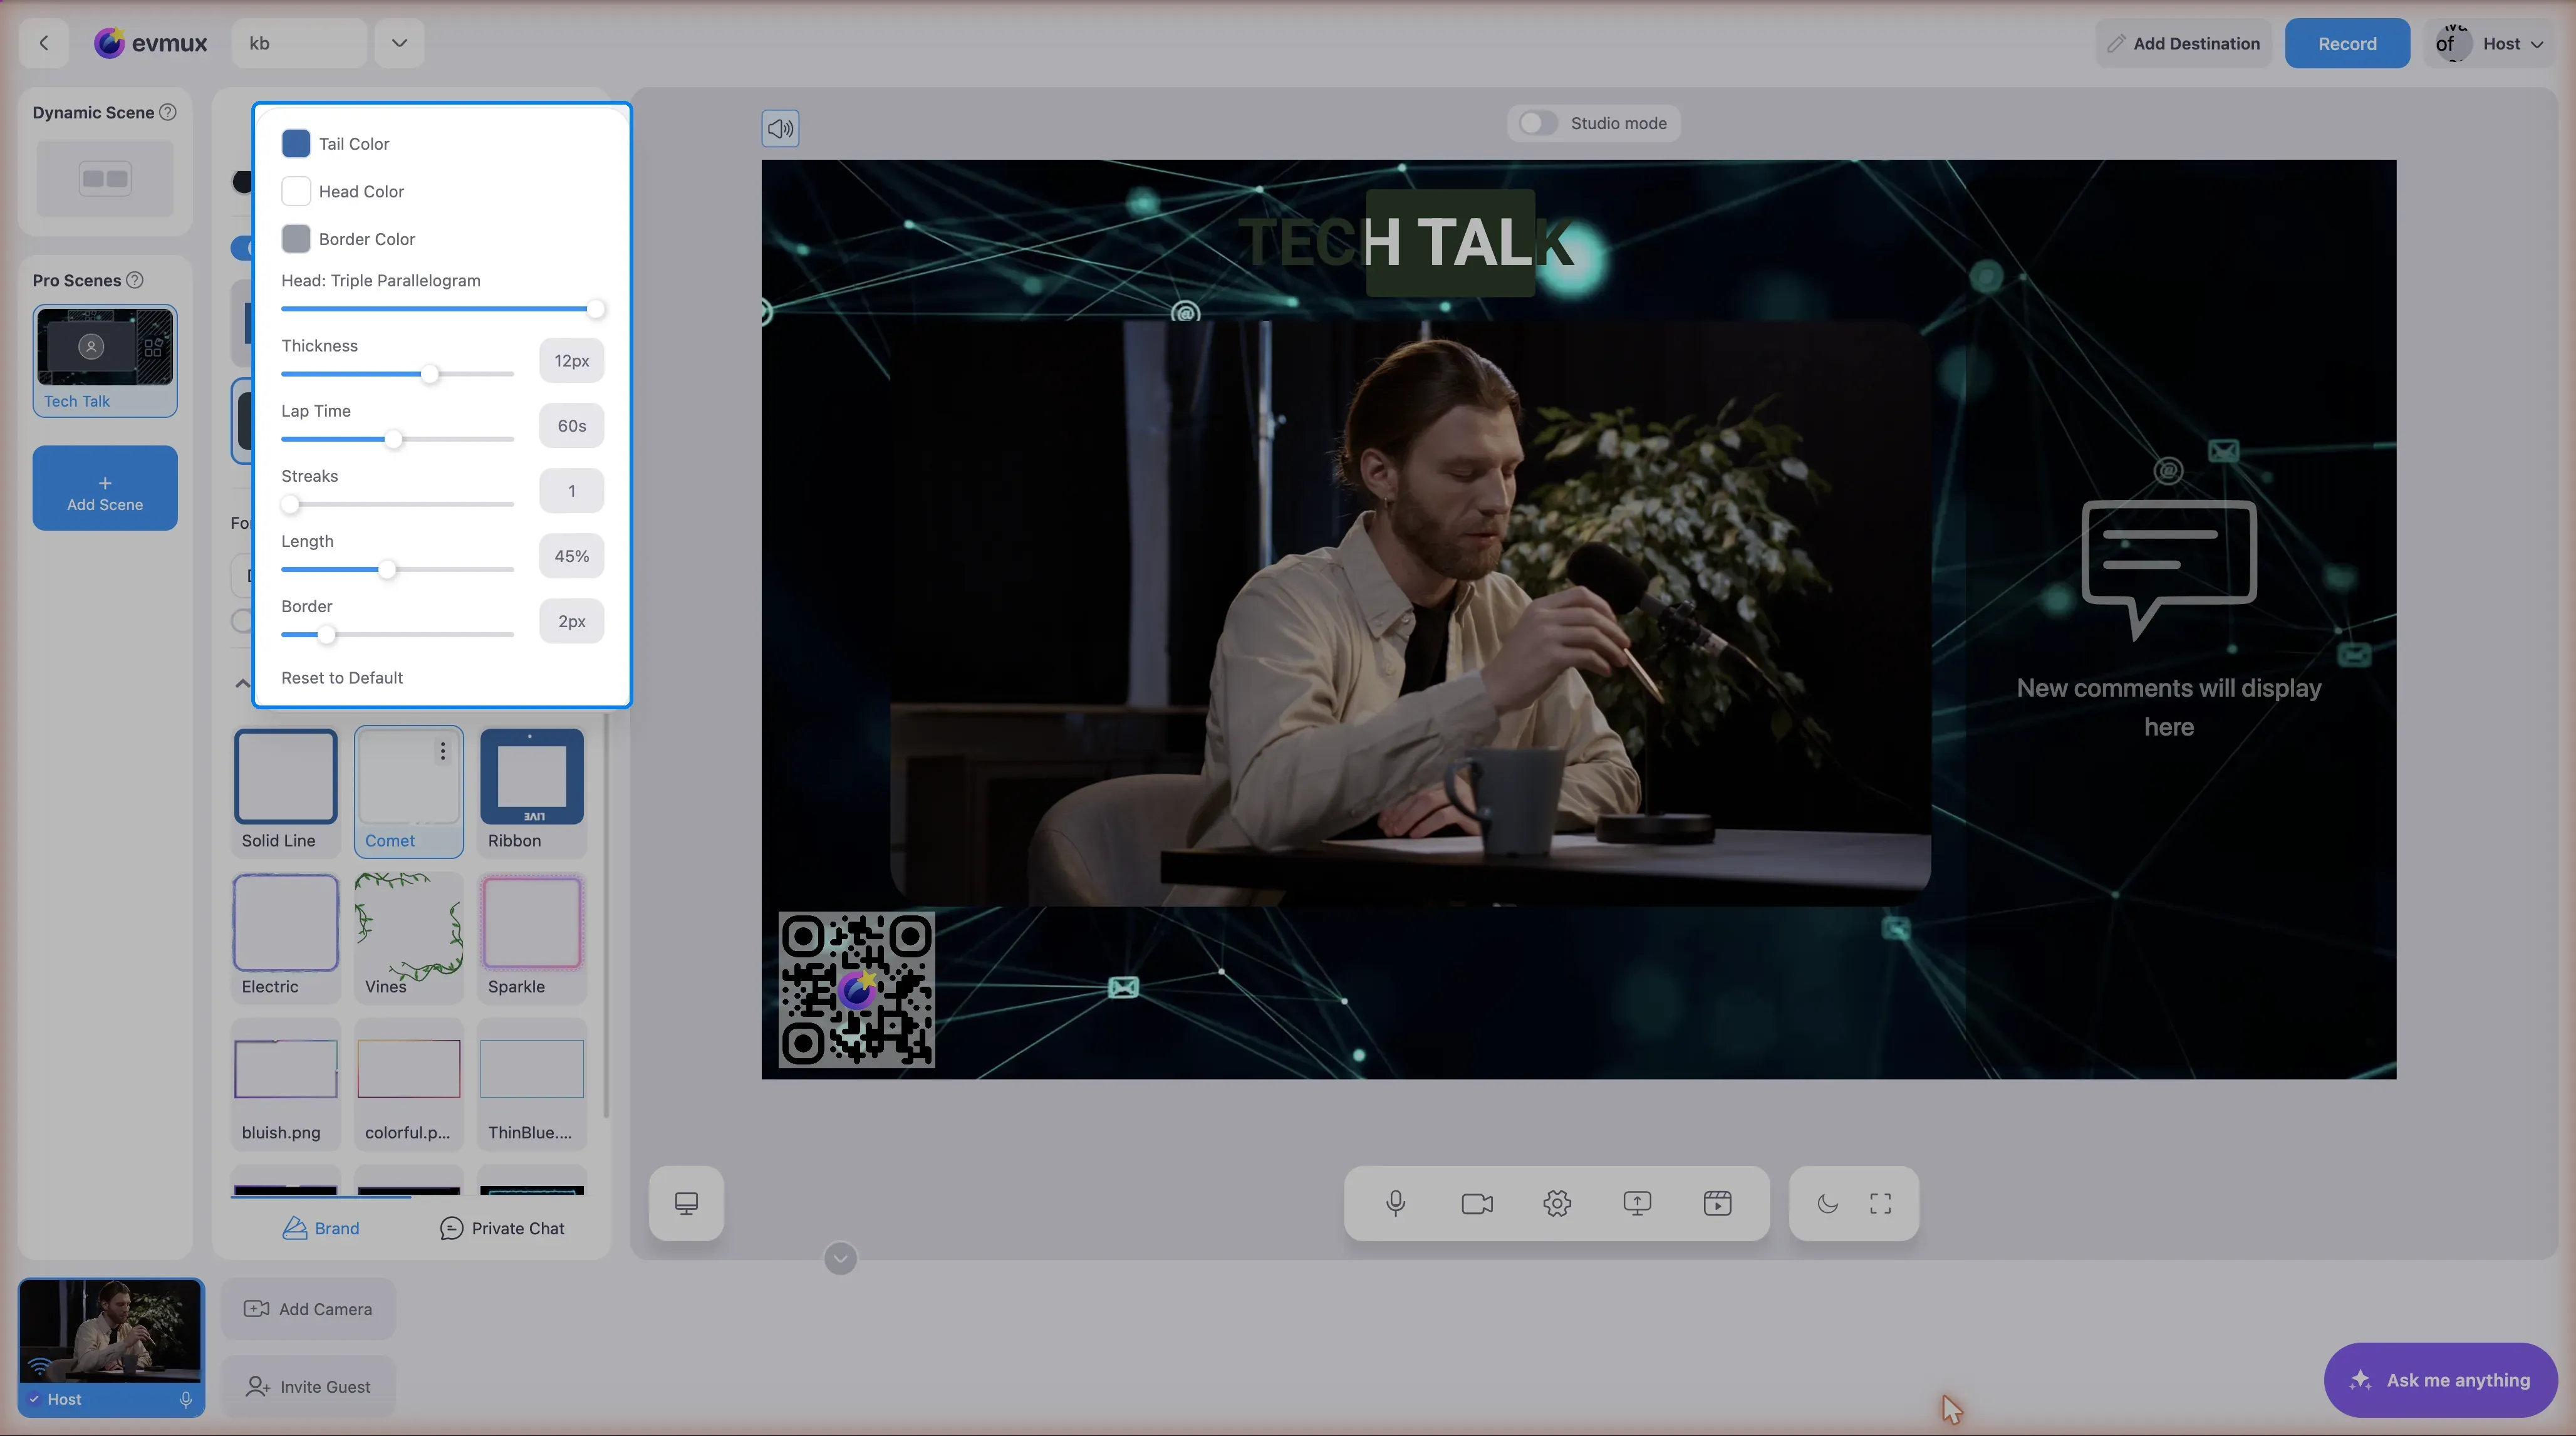
Every built-in frame draws itself to fit the layer, follows the layer’s rounded corners, and has its own settings: click the frame, then its three dots (⋮). Each settings menu ends with Reset to Default.
Using Solid Line Frame (Recommended)
The Solid Line frame is a simple, customizable colored border:
- In the Frames section, click on Solid Line
- Click the three dots (⋮) to open settings
- Customize the frame:
| Setting | Description |
|---|---|
| Width | Border thickness (6-50 pixels) |
| Color | Border color (uses Primary Color by default, or set custom) |
| Gradient | Enable for two-color gradient effect |
| Gradient Color 2 | Second color when gradient is enabled |
| Gradient Angle | Direction of gradient (0-360°) |
| Animate Gradient | Makes the gradient colors animate |
| Glow | None, Inner, Outer, or All - adds glow effect |
- Click Reset to Default to restore original settings
The Animated Frames
All of these are picked the same way: click the tile in Frames, then the three dots (⋮) for settings.
Comet — a light streak with a fading tail circling the layer.
| Setting | Description |
|---|---|
| Tail Color / Head Color | Color of the fading tail and of the bright head |
| Head Shape | Dot, Triple Dot, Pill, Parallelogram or Triple Parallelogram |
| Thickness | Streak thickness (1-18 px) |
| Lap Time | Seconds for one trip around the layer (5-240) |
| Streaks | How many streaks travel at once (1-4) |
| Length | How long the tail trails behind (0-100%) |
| Border / Border Color | A steady outline under the streak (0-12 px) |
Ribbon — text that runs around the layer on a band.
| Setting | Description |
|---|---|
| Text | The words to show (up to 60 characters), repeated around the edge |
| Font / Font Size | Same fonts as text layers; 8-40 px |
| Separator | Dot, Slash, Star, Diamond or None between repeats |
| Spacing | Space between repeats (0-120 px) |
| Uppercase / Reverse Direction | Capitalize the text; run it the other way |
| Text Color / Band Color | Band color follows the Primary Color unless overwritten |
| Lap Time | Seconds for one full trip (60-240) |
Electric — the edge crackles like an electric arc.
| Setting | Description |
|---|---|
| Color | Arc color (follows the Primary Color unless overwritten) |
| Thickness | Arc thickness (1-6 px) |
| Amplitude | How far the arcs stray from the edge (2-40 px) |
| Rotation Speed | How fast the pattern travels along the edge (0-10, 0 = stays in place) |
| Intensity | How frantically the arcs reshape (1-10) |
| Arcs | Overlapping arcs (1-4) |
| Glow | Soft glow strength (0-100%) |
| Border / Border Color | A steady outline under the arcs (0-6 px) |
Vines — weeds sprout from two opposite corners, grow along the edges until they meet, bloom, hold, wither back from the corners and start again.
| Setting | Description |
|---|---|
| Leaf / Stem / Flower Color | Colors of the plant; flowers default to white |
| Flowers | Show flowers after the vines have grown |
| Stay Grown | Grow and bloom once, then stay without withering |
| Vines | Number of strands (1-3); several strands braid around each other |
| Density | How many leaves (1-10) |
| Leaf Size | 8-40 px |
| Grow Time / Hold Time | Seconds to fill the frame (2-20) and to stay grown (2-60) |
| Sway | Breeze strength (0-100%) |
Sparkle — a glossy pastel band with decorations.
| Setting | Description |
|---|---|
| Color 1 / Color 2 | The band’s gradient colors |
| Thickness | Band thickness (4-24 px) |
| Speed | Twinkle and float tempo (1-10) |
| Pearls | A string of pearls along the band |
| Sparkles | Twinkling sparkles, with their Amount and Sparkle Size underneath |
| Hearts | Floating hearts, with Heart Color, Amount and Heart Size underneath |
Using Image Frames
- Click on an existing frame image to select it
- Or click + Add to upload your own frame
- Adjust Color (hue shift) and Size as needed
Step 2: Override Frame for Specific Layers (Optional)
If you want a different frame on a specific layer:
How to Override:
- Select your camera layer (click on it in the scene or Layers panel)
- In the layer toolbar, click the Frame icon (picture frame icon)
- Choose from:
| Option | Description |
|---|---|
| Default | Uses the session’s default frame from Branding |
| None | Removes the frame from this layer only |
| Solid Line / Comet / Ribbon / Electric / Vines / Sparkle | A built-in frame with its own settings for this layer |
| Frame images | Select a specific frame for this layer |
Customizing a Layer-Specific Built-in Frame:
When you select a built-in frame for a specific layer, its settings appear under the tiles and are independent from the default. Reset to Default at the bottom restores that frame’s defaults for this layer only.
This lets you have different colored borders on different cameras, or a Ribbon with each guest’s name.
Quick Summary
| Goal | Where to Set |
|---|---|
| Frame on ALL cameras | Brand tab → Frames → Select frame |
| Frame on ONE specific camera | Select layer → Frame icon → Choose frame |
| Remove frame from one camera | Select layer → Frame icon → None |
| Remove all frames | Brand tab → Frames → Click active frame to deselect |
Tips
- Start with Solid Line - It’s the easiest to customize and looks professional
- Ribbon for names - Put a Ribbon on each guest with their handle as the text
- Animated frames are light - they are drawn live and cost little, even with many feeds
- Use Primary Color - Solid Line uses your Primary Color by default for consistent branding
- Gradient for flair - Enable gradient for a more dynamic look
- Glow for emphasis - Add glow to make speakers stand out
- For image frames, use PNG with transparent center
Custom Frame Images
To upload your own frame image:
- Go to Brand tab → Frames → + Add
- Upload a PNG image (transparent background recommended)
- The image should have a transparent center where the video shows through
- Your custom frame appears in the frame list