

How to Add a Video Layer
This guide shows you how to add pre-recorded videos to your broadcast for intros, outros, B-roll, or any media playback.
Quick Steps
- Click Add New Layer in the Layers panel
- Select Media Files from the menu
- Upload or select a video file
- Position and size the layer on the scene
Understanding Video Layers
Video layers display pre-recorded video content in your broadcast. Unlike live camera feeds, these are files that can be played, paused, and looped.
| Use Case | Example |
|---|---|
| Intro | Pre-show animation |
| Outro | End screen |
| B-roll | Supplementary footage |
| Transitions | Video between segments |
| Background | Animated background |
Method 1: Add Video Layer
Step 1: Add New Layer
- In the Layers panel, click Add New Layer
- Select Media Files from the menu
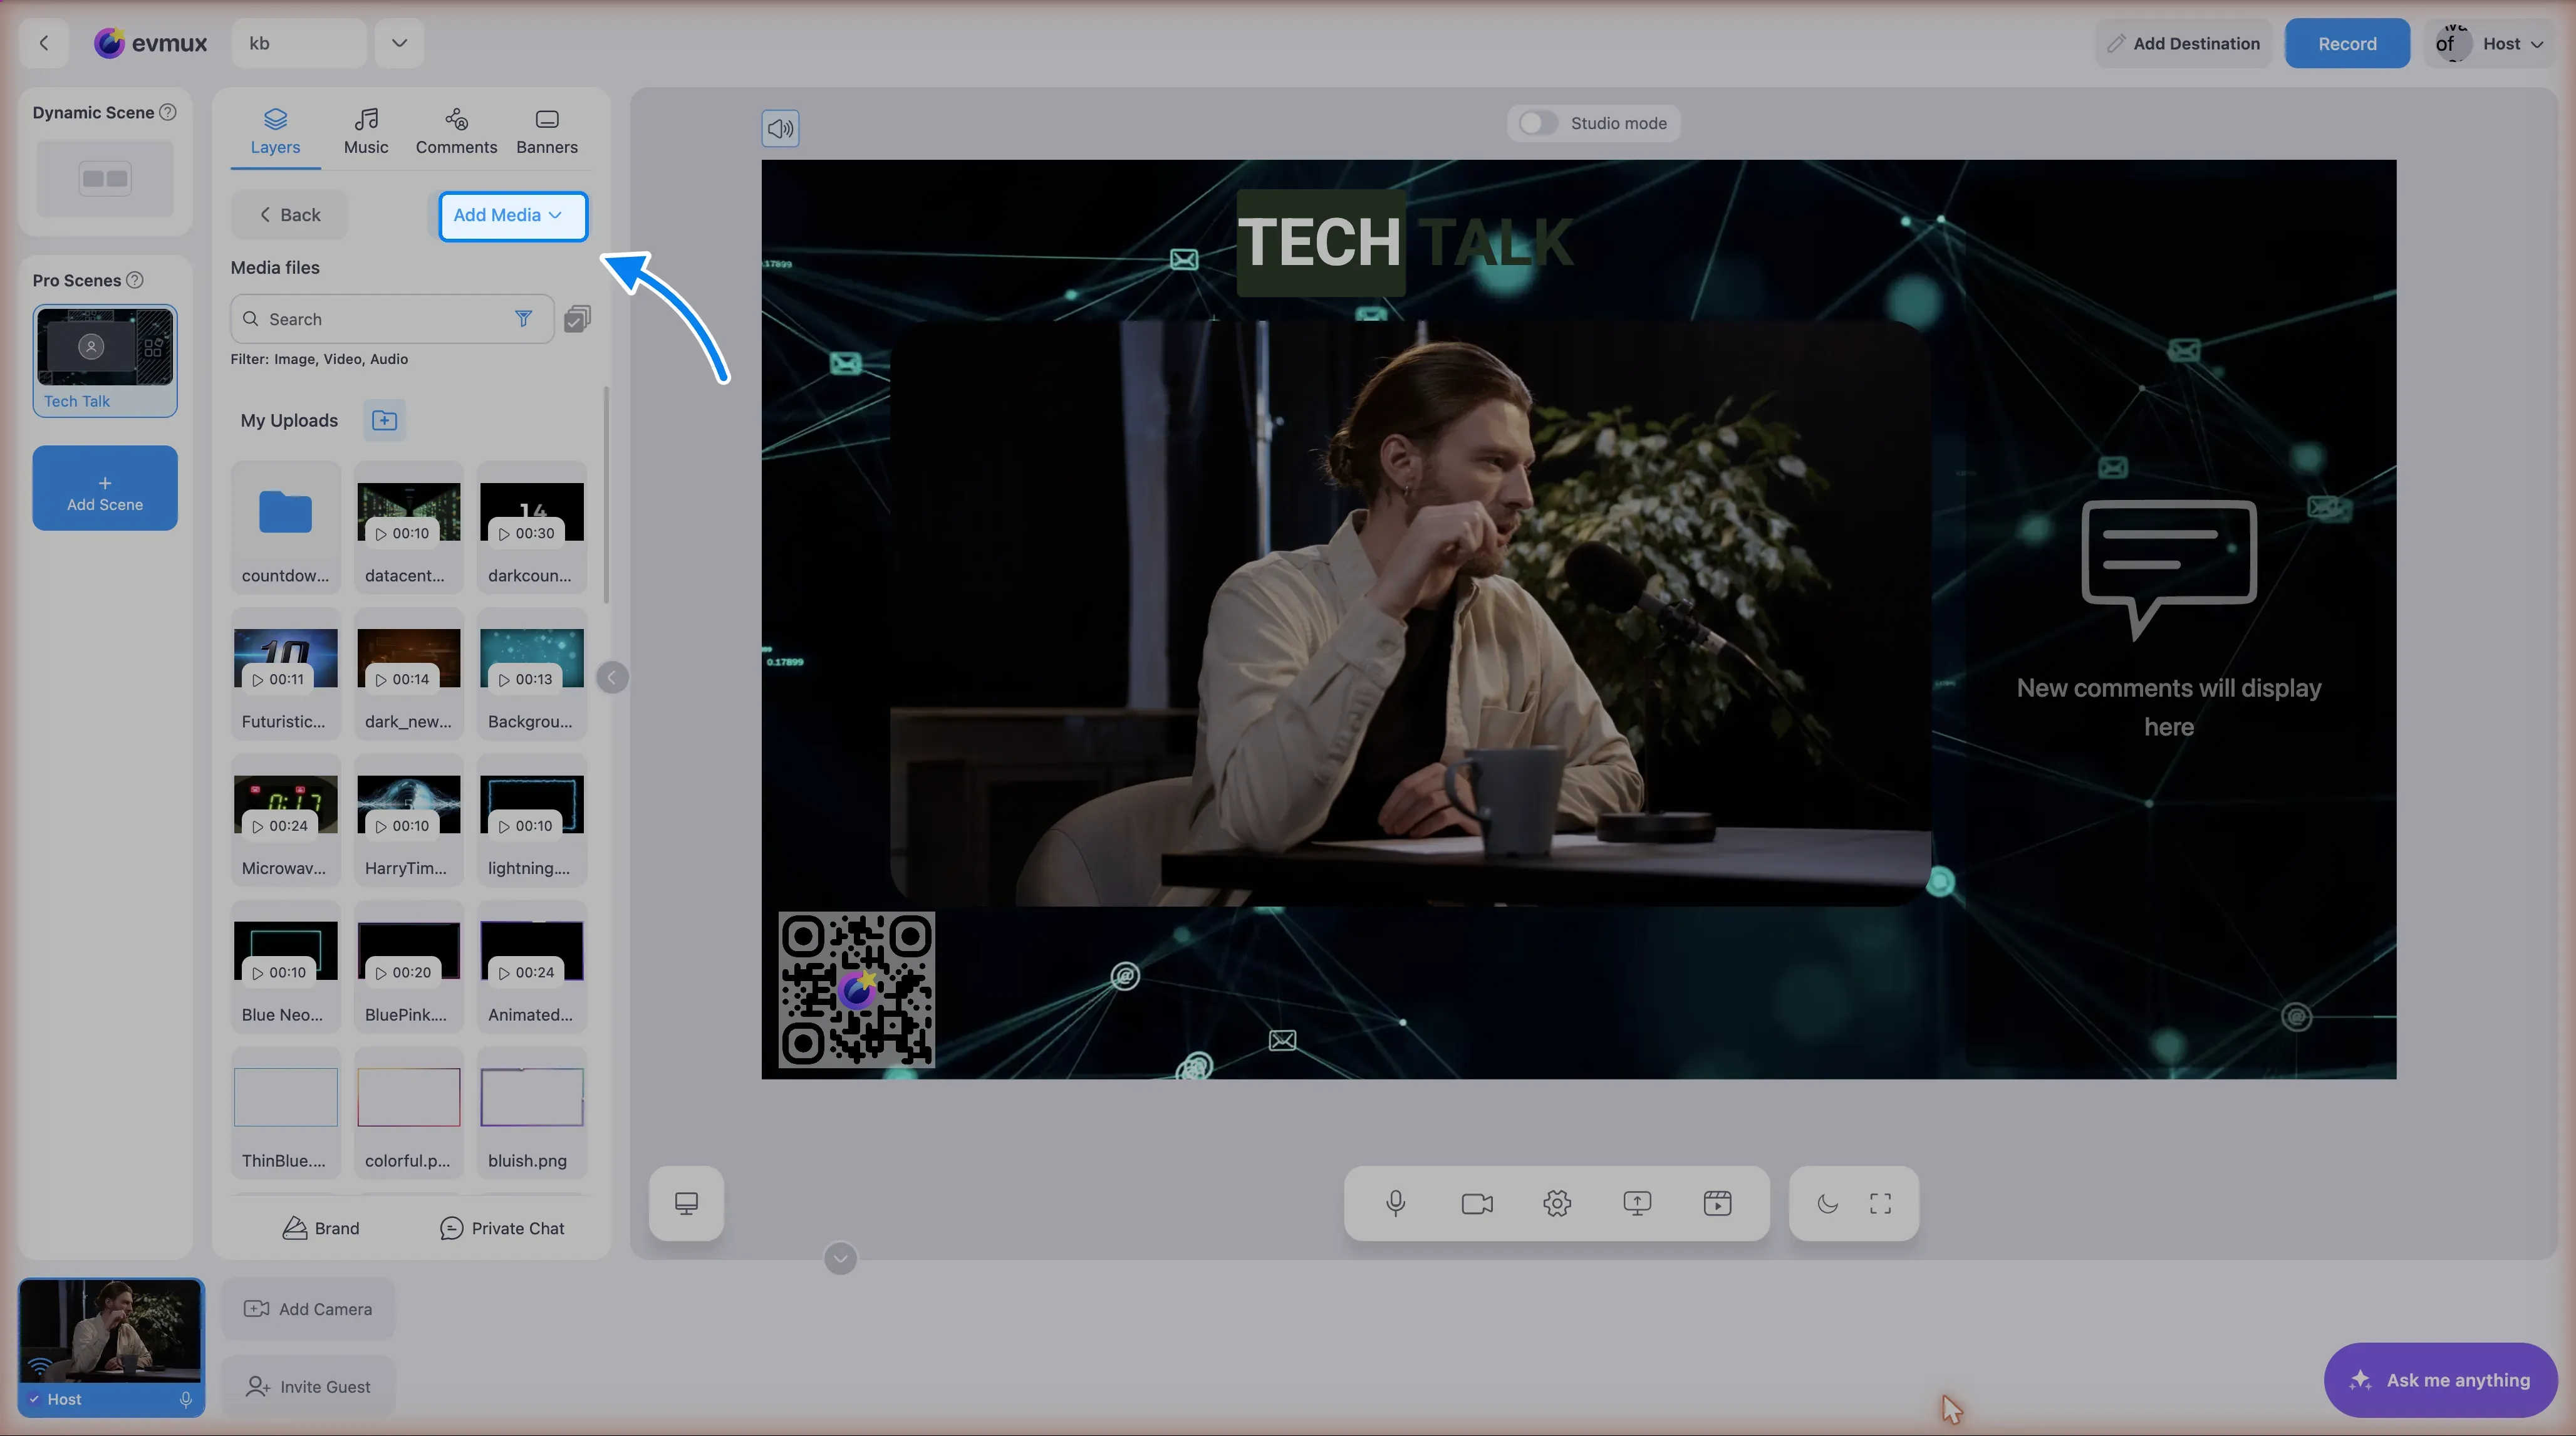
- The Media Chooser opens with your media library
Step 2: Select Video
Upload new video:
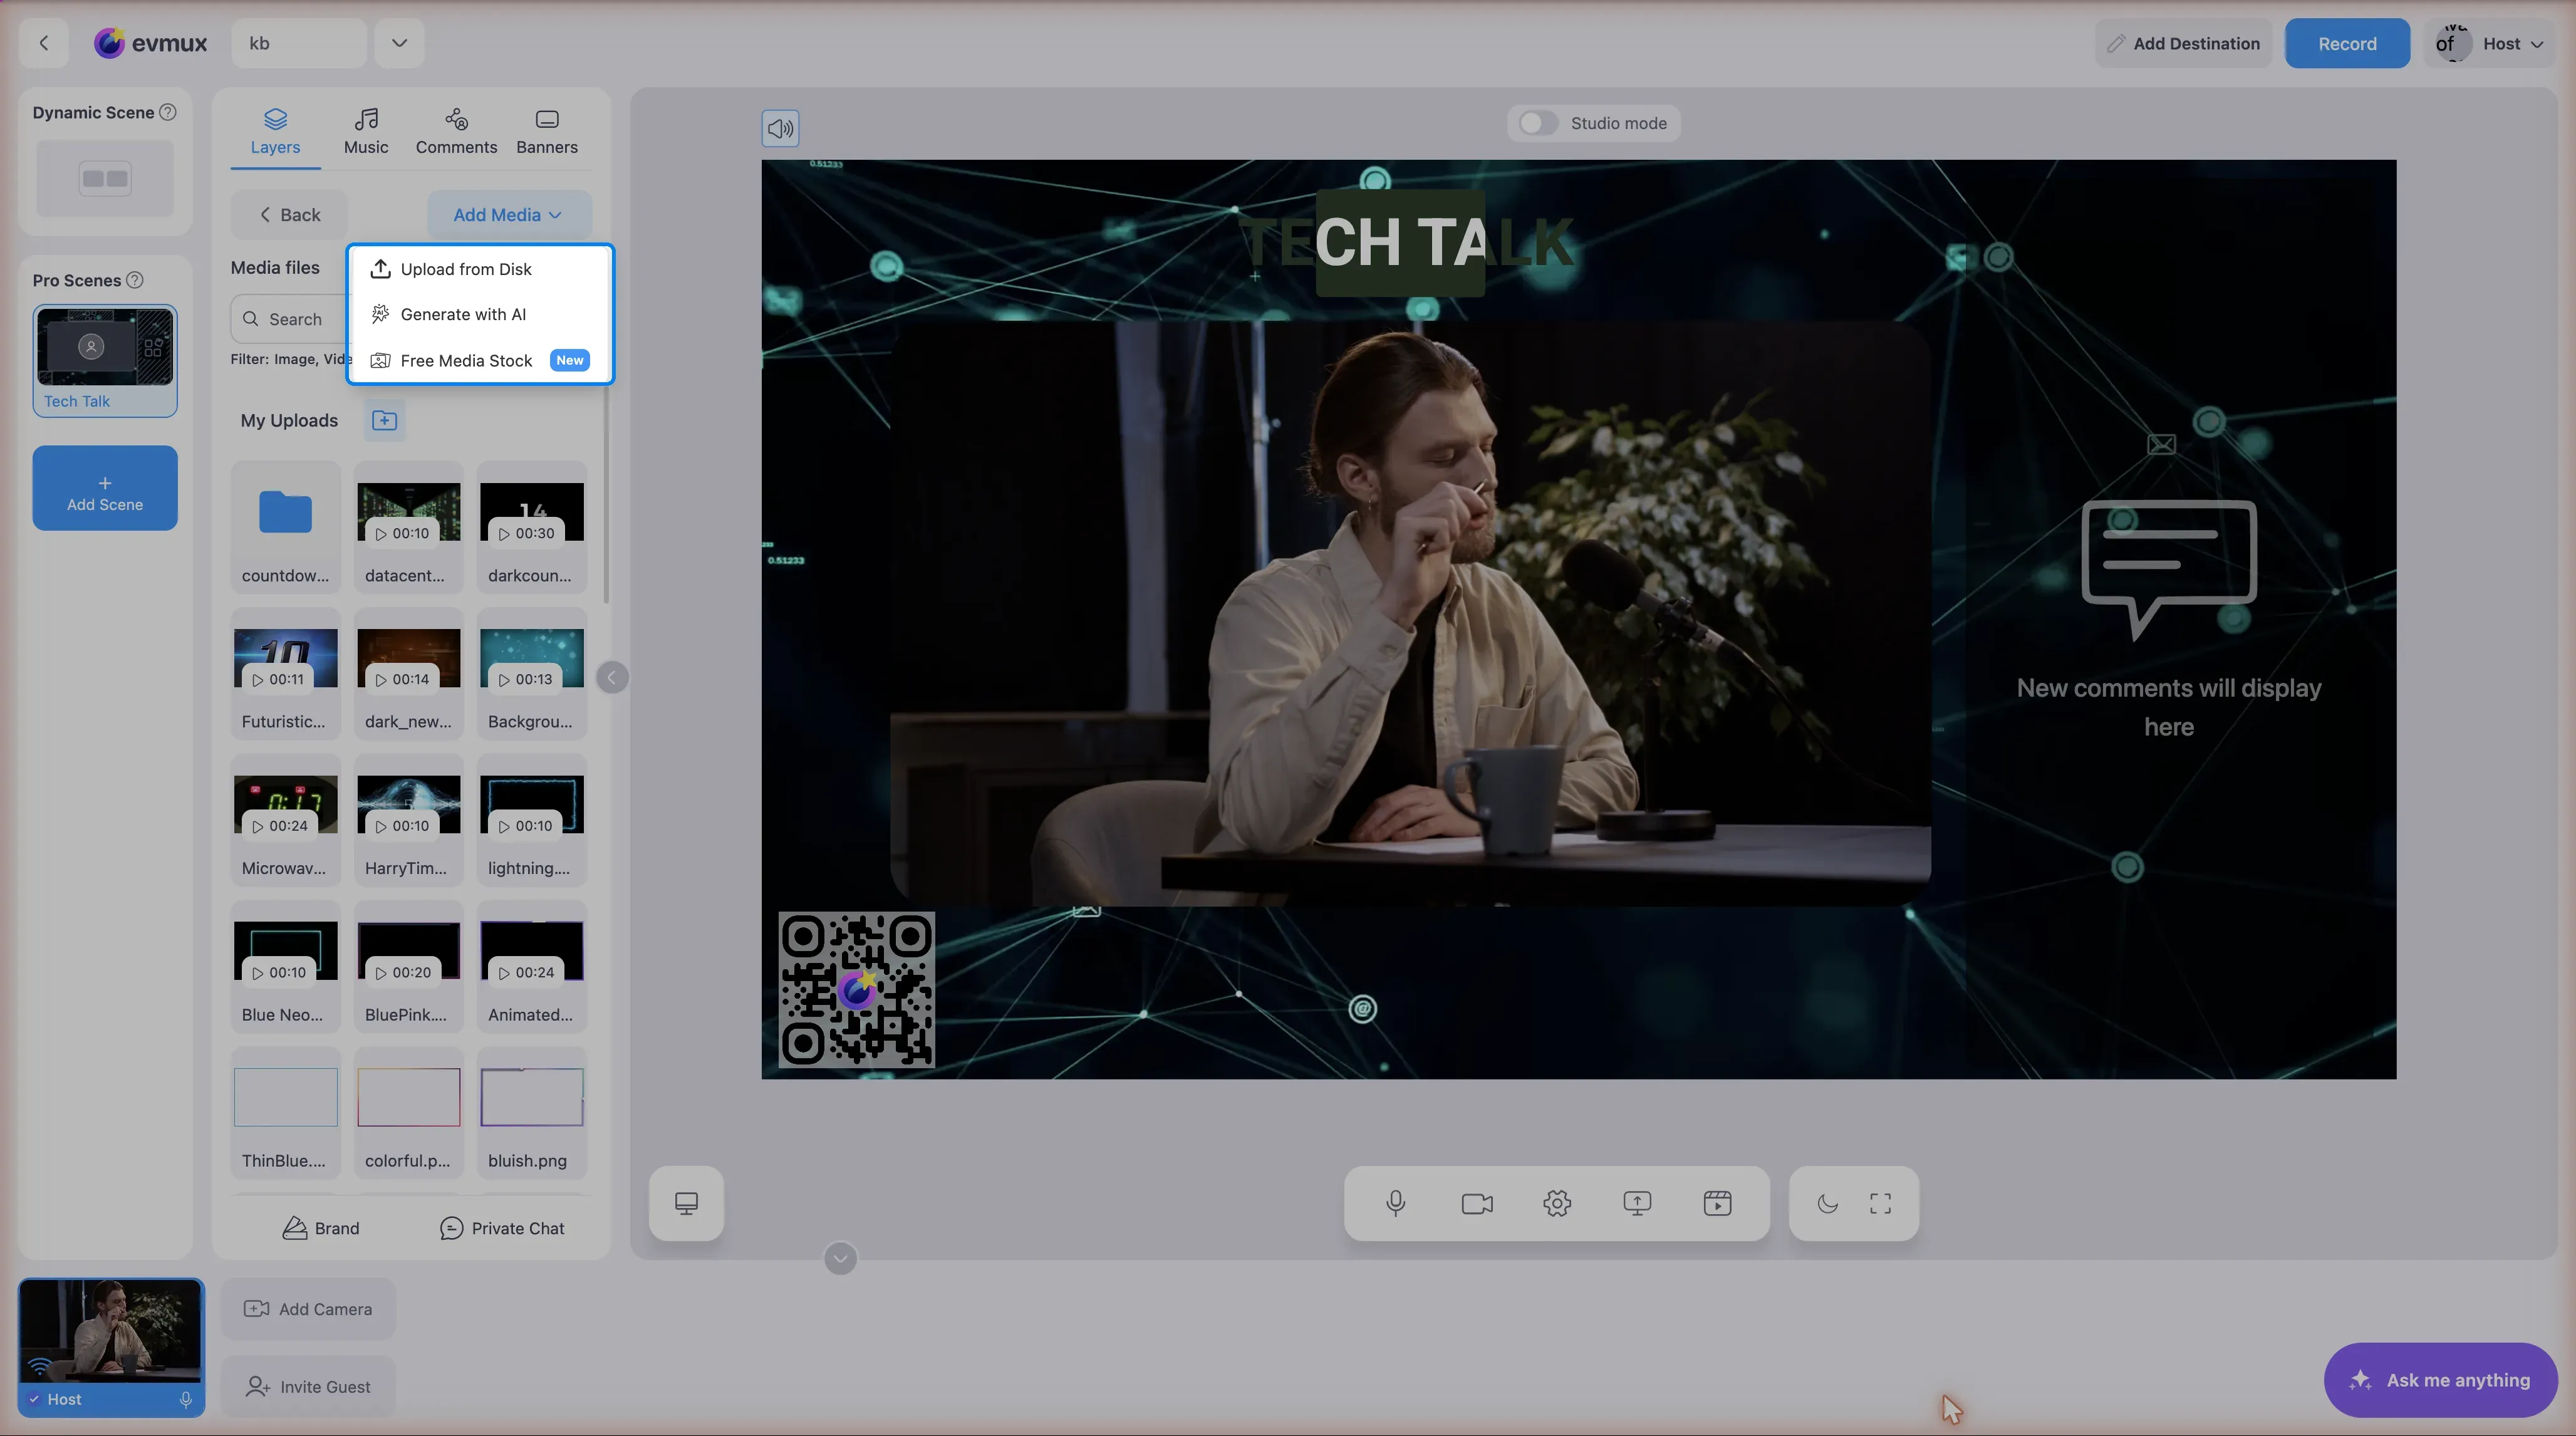
- Click the green Add Media button at the top of the chooser — it opens a small dropdown. (There is no button called “Upload”, “Upload New” or “Browse”.)
- Choose Upload from Disk, then pick the file from your computer. The other entries in the same dropdown are Generate with AI (images only) and Free Media Stock, where that library is enabled for the account.
- Wait for the upload to finish — it then appears in the gallery below.
From Media Library:
- Browse previously uploaded videos
- Click to select
- Video is added to the scene
Step 3: Position and Size
- Drag the video layer on the scene
- Resize using corner handles
- For fullscreen: set to 1920x1080 at position 0,0
Video File Requirements
Supported Formats
| Format | Extension | Notes |
|---|---|---|
| MP4 | .mp4 | Recommended, universal |
| WebM | .webm | Good for web |
| MOV | .mov | Apple format |
Recommended Settings
| Property | Recommended |
|---|---|
| Resolution | Match scene (1920x1080) |
| Frame Rate | 30 or 60 fps |
| Codec | H.264 (MP4) |
| Bitrate | 8-15 Mbps |
| Audio | AAC |
Video Playback Controls
Basic Controls
| Control | Action |
|---|---|
| Play | Start video playback |
| Pause | Stop playback at current frame |
| Stop | Return to beginning |
| Loop | Repeat continuously |
Accessing Controls
- Select the video layer
- Look for playback controls in:
- Layer toolbar
- Properties panel
- Right-click context menu
Video Layer Settings
Playback Settings
| Setting | Description |
|---|---|
| Auto-play | Start when scene loads |
| Loop | Repeat when video ends |
| Volume | Audio level (0-100%) |
| Playback Speed | Normal, slow, fast |
Display Settings
| Setting | Description |
|---|---|
| Fit Mode | Contain, Cover, Stretch |
| Opacity | Transparency level |
| Blend Mode | How it blends with layers below |
Common Video Layer Uses
Intro Video
- Add video layer
- Set to fullscreen (1920x1080)
- Position at 0,0
- Disable loop (play once)
- Switch scenes when finished
Background Loop
- Add video layer
- Set to fullscreen
- Send to back (behind other layers)
- Enable loop
- Lower opacity if too prominent
Picture-in-Picture Video
- Add video layer
- Resize smaller (e.g., 480x270)
- Position in corner
- Bring to front
Lower Third Animation
- Add video layer with animated graphic
- Position at bottom of screen
- Use video with transparency (WebM)
Managing Video Audio
Adjust Video Volume
- Select video layer
- Find volume control in properties
- Adjust level (0-100%)
There is no audio mixer panel in evmux — a layer’s volume lives with the layer, and a participant’s volume is on their tile in the Fast Access Bar.
Mute Video Audio
- Set the layer’s volume to 0%
- Useful for background videos
Balance with Other Audio
- Video audio should not overpower speakers
- Set lower if used as background
- Use ducking for music-style videos
Multiple Video Layers
You can have multiple video layers:
- Different videos on different scenes
- Picture-in-picture layouts
- Overlapping animated elements
Performance Considerations
- Multiple videos use more resources
- Limit simultaneous video playback
- Use lower resolution for small displays
Video as Transitions
Using Video Between Segments
- Create a scene with fullscreen video
- Video plays the transition animation
- Switch to next scene when video ends
Automated Transition
If supported:
- Set video as scene transition
- Video plays during scene switch
- New scene appears when video ends
Troubleshooting
Video won’t play, or shows a black screen?
- Check the file format is supported
- Verify the file uploaded completely
- Most often it is the file’s encoding — re-encode it with the evmux Video Converter: https://publicfiles.evmux.com/static/videoConverter/download.html
No audio from video?
- Check the layer volume isn’t at 0
- Verify the video actually has an audio track
- If the audio is there but silent or out of sync in evmux, re-encode the file with the evmux Video Converter (link above)
Video playback is choppy?
- Use a lower resolution video
- Check the network connection
- Reduce the number of video layers
- An extreme bitrate is a common cause — re-encode it with the evmux Video Converter: https://publicfiles.evmux.com/static/videoConverter/download.html
Video looks stretched?
- Check fit mode (contain vs stretch)
- Match aspect ratio to layer size
- Use “Contain” to maintain proportions
Video doesn’t loop?
- Enable loop in video settings
- Check if auto-play is enabled
- Verify video playback started
Video starts at wrong time?
- Disable auto-play if not needed
- Use play controls manually
- Reset video position before scene switch
Best Practices
- Optimize files - Compress videos appropriately
- Match resolution - Don’t upscale small videos
- Test playback - Verify before going live
- Manage audio - Balance with other sources
- Use loops carefully - Ensure seamless loop points
- Have backups - Prepare for playback issues
If the video misbehaves
If a video will not play, shows a black screen, stutters, freezes, loses its sound or drifts out of sync, the usual cause is the file itself — a very high bitrate, or header data stored at the end of the file, or an awkward codec. That cannot be detected while it uploads, so a successful upload does not mean the file is fine.
Re-encode it with the evmux Video Converter and use the converted file instead: https://publicfiles.evmux.com/static/videoConverter/download.html — a simple Windows and macOS program, nothing to configure. The conversion itself can take a while depending on the computer’s graphics performance. See Re-encode a Problem Video.
Related
- Re-encode a Problem Video
- Layers System
- Media Management
- Layer Types Reference
- How to Add Background Music