

How to Add a Lower Third (Name Banner)
This guide shows you how to configure lower thirds to identify speakers and display names during broadcasts.
Quick Steps
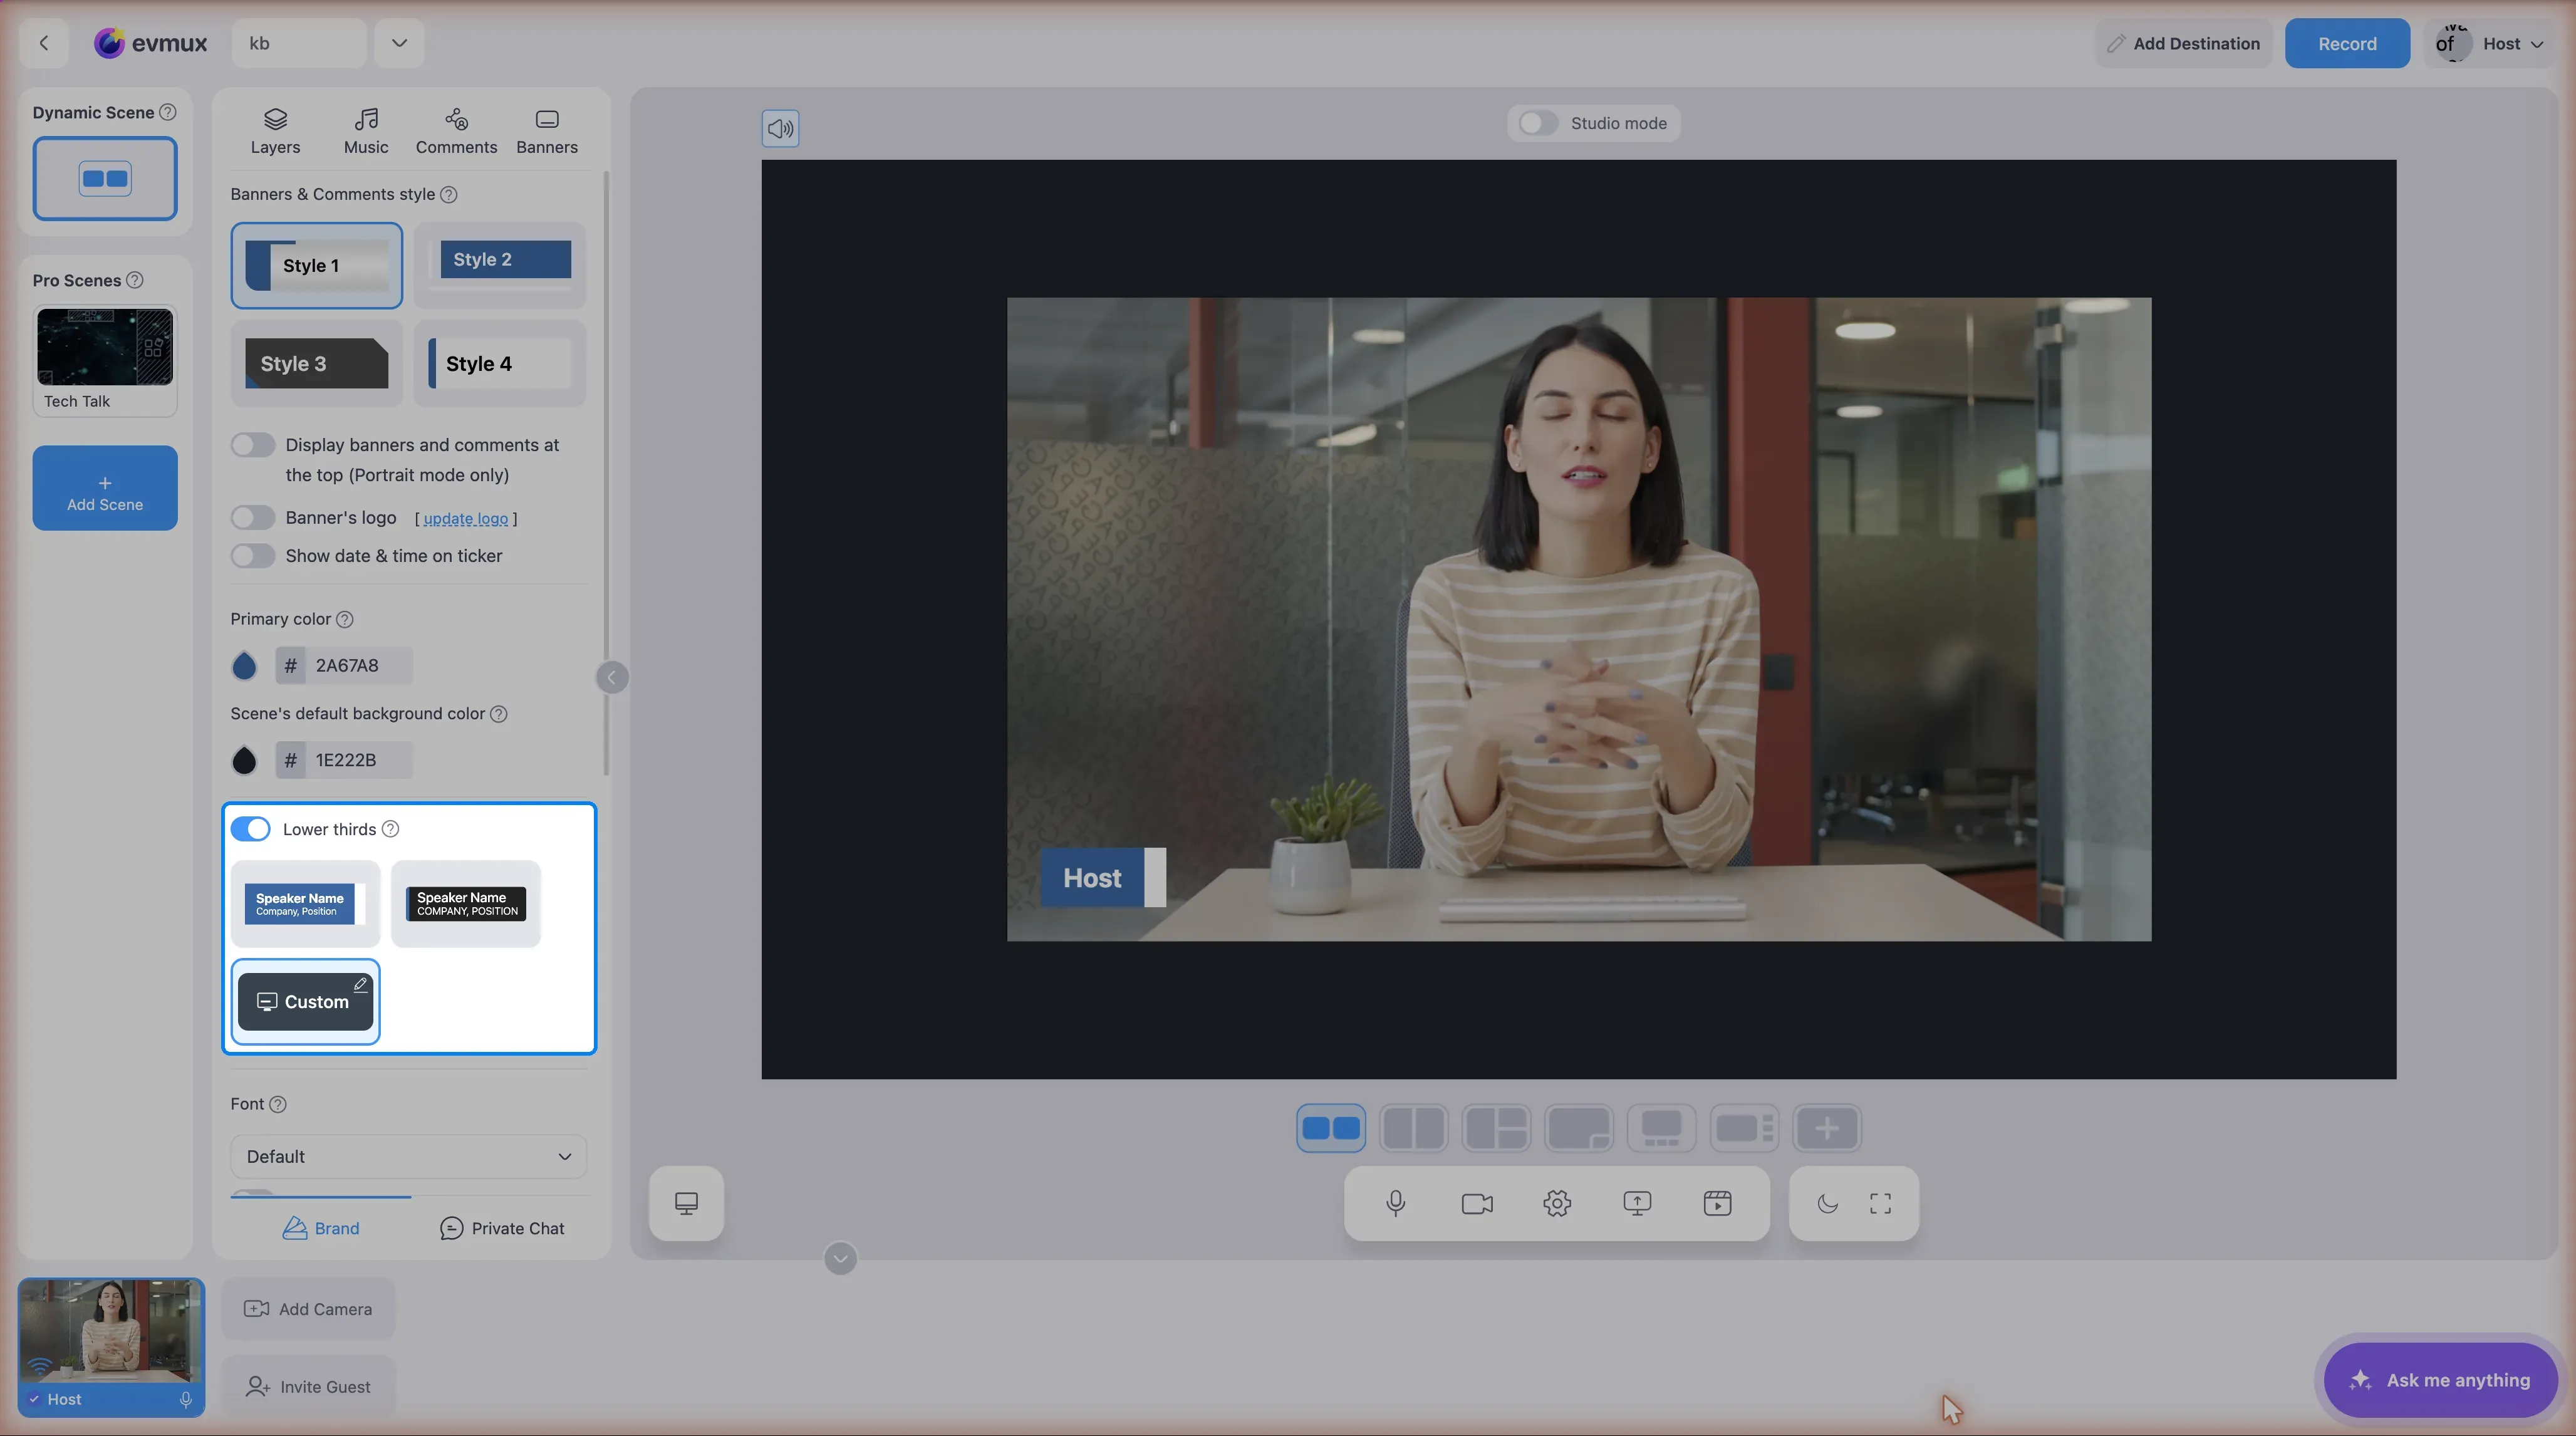
- Click the Brand tab in the left sidebar
- Find the Lower thirds section
- Toggle on to enable lower thirds for speakers
- Select a preset or click Custom to customize
Hotkey: show / hide lower thirds
Ctrl + Shift + O toggles lower thirds on and off — it is a built-in default shortcut
(toggleLowerThirds), not something you have to create, and like every other shortcut it can
be reassigned in Settings -> Hotkeys. Use it to drop the name tags mid-show without going
back to the Brand tab.
What is a Lower Third?
A lower third is a graphic overlay that displays on screen showing:
- Speaker’s name (first line)
- Job title or description (second line)
- Optionally: speaker’s title prefix and logo
Where to Find Lower Third Settings
Lower thirds are configured in the Brand tab (not the Banners tab):
- Open the left sidebar
- Click the Brand tab
- Scroll to the Lower thirds accordeon section
- Toggle the switch to enable lower thirds for speakers in the dynamic scene
Detailed Steps
Step 1: Enable Lower Thirds
- Go to Brand tab
- Find Lower thirds section
- The toggle enables/disables lower thirds for speakers in the dynamic scene
- Tooltip: “Toggle on to display guests name as part of the stream.”
Step 2: Choose a Preset Style
The Brand tab shows three options:
| Option | Description |
|---|---|
| Preset 1 | First built-in animation style |
| Preset 2 | Second built-in animation style |
| Custom | Open full customization popup |
Click one to select it. The active style shows a highlighted border.
Step 3: Customize (Optional)
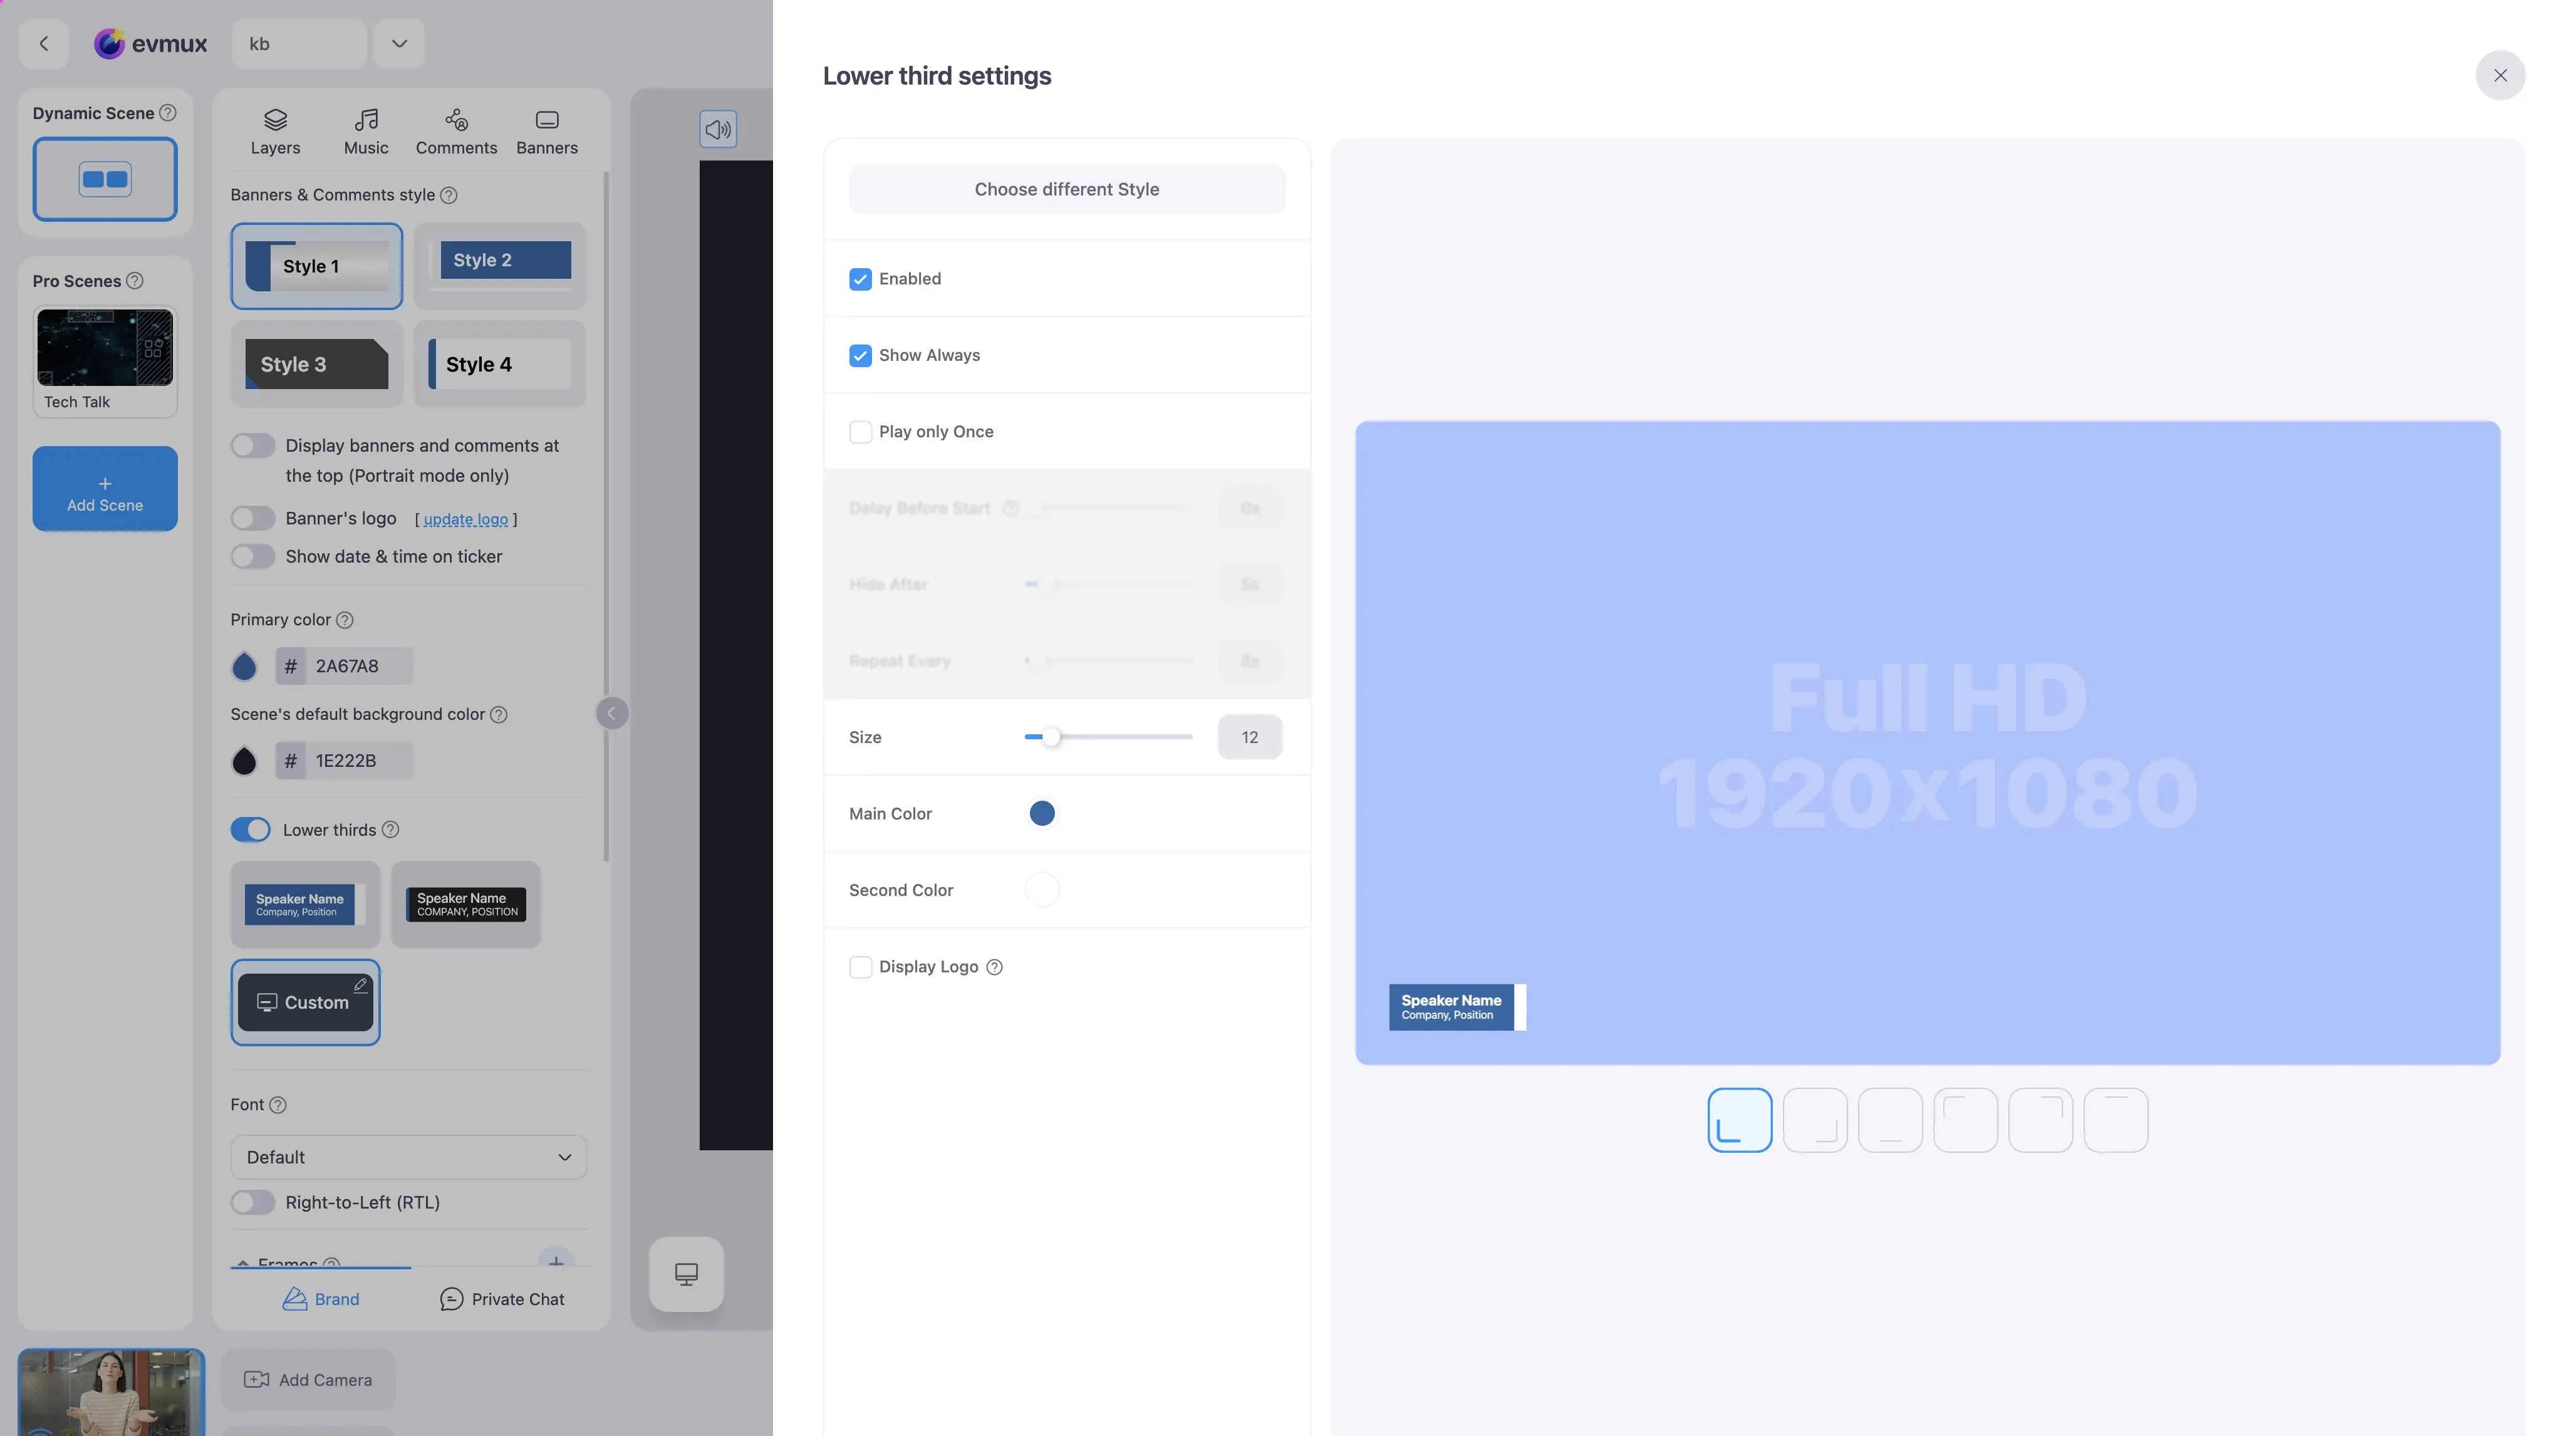
Click Custom to open the Lower third settings popup. This provides full control over:
Text Content:
- First line - Main text (name), max 50 characters
- Second line - Secondary text (title), max 50 characters
Display Options:
- Enabled checkbox - Turn lower third on/off for this speaker
- Show Always checkbox - Keep visible continuously
- Play only Once checkbox - Show once then hide
Timing Settings (disabled when “Show Always” is on):
- Delay Before Start - Wait 0-60 seconds before appearing
- Hide After - Visible for 0-60 seconds
- Repeat Every - Cycle time 0-300 seconds
Appearance:
- Size slider - Scale 0-100%
- Main Color - Primary color picker
- Second Color - Secondary color picker
Speaker Options (when linked to a speaker):
- Display Title checkbox - Show speaker’s title (e.g., Mr/Ms/Doc/Prof)
- Display Logo checkbox - Show speaker’s logo beside the lower third
Step 4: Choose Animation Style
In the Custom popup, click Choose different Style to see all available animations. There are 14 styles: eleven standard animated designs, including the two presets from the Brand tab, and three that use a video background. Click one to preview it on the right, then keep it or go back to the list.
Step 5: Set Position
Use the position chooser at the bottom of the preview:
| Position | Code | Location |
|---|---|---|
| Bottom-left | bl | Lower left corner |
| Bottom-center | bc | Lower center |
| Bottom-right | br | Lower right corner |
| Top-left | tl | Upper left corner |
| Top-center | tc | Upper center |
| Top-right | tr | Upper right corner |
Click a position icon to place the lower third there.
Step 6: Video Background Options
For styles ending in _v (video backgrounds):
- Background opacity slider - Adjust 0-100%
- Video background selector - Choose from 20 video backgrounds (v_bg_1 through v_bg_20)
Custom Lower Third per Layer
For speaker layers, you can customize the lower third individually:
- Select the speaker layer in the scene
- In the Layer Toolbar, find Custom Lower third
- Check the checkbox to override the global style
- Click Lower third style to open the customization popup
Close the Popup
- Click the X button in the top right
- Press Escape key
- Click outside the popup (on the darkened background)
Best Practices
Design
- Keep first line short (names)
- Use second line for titles/roles
- Choose colors that contrast with your video content
- Test position doesn’t cover important content
Timing
- “Show Always” keeps lower thirds visible throughout
- “Play only Once” is good for introductions
- Use “Repeat Every” for recurring reminders
For Dynamic Scenes
- Lower thirds appear automatically on speaker layers
- Configure per-speaker in the speaker settings
- Can be overridden per-layer in toolbar
Troubleshooting
Lower third not appearing?
- Check that “Enabled” is checked
- Verify lower thirds are enabled in Brand tab toggle
- Make sure you’re in a dynamic scene with speakers
Timing controls greyed out?
- “Show Always” is enabled - this disables timing controls
- Uncheck “Show Always” to access Delay, Hide After, and Repeat settings
Can’t see Custom button?
- Make sure you’re in the Brand tab, Lower thirds section
- The three options should appear below the toggle